Sunday, October 31, 2021

Product Review: New York Bakery Breadsticks


I have two words for this one: Utter Disappointment. 

I don't normally buy products like this anymore, (although I used to buy their Texas Toast once every month or two in the past), because making garlic bread at home is far superior, even if you opt for "quickie" garlic bread with garlic powder instead of minced garlic). 

It was late, I worked all day, and I just wanted a little bit of garlic bread for a meal. I talked myself out of going to a fast food joint, because I knew it would give me misery and it just wasn't really appealing even though I was hungry. So I decided to pick up some fresh pasta (Rana), a salad, and some garlic bread. I already had homemade sauce at home. 

Texas Toast was rejected out of hand, I couldn't deal with the frozen slab of oil and garlic on top of the bread. It's soooo bad. Plus, no room in freezer for excess slices. So...hey, why not try these breadsticks? The breadsticks can't be as bad, right? They can't screw up breadsticks, right? 

Wrong! 

It looked like they might be okay. Not as much of the oil & garlic topping: Great! Short baking time: Good! Slap 'em on a pan, throw 'em in the oven (definitely at a lower temp than recommended), and all is well. 

And so it was. Prep time was short; good meal in about 20 minutes. Waaaaay better than going through that fast food line, which would have probably taken the same amount of time, since Whataburger,  (which is what I would have chosen), is so busy at later hours here. (Small town.) 

So what killed the possible enjoyment of the breadsticks? Sugar. ADDED sugar. Why, why, why? Bread does NOT need added sugar,(beyond the amount used to feed the yeast in the dough), unless it is the type that is supposed to be sweet (like Hawaiian Bread, etc.). 

Sweet garlic bread? Are you kidding me? In what dimension is this acceptable? 

I hate to waste food, so the next evening, I made a garlic spread with fresh garlic & real butter. Cut the remaining bread sticks in half, and spread it on. Finished with a sprinkle of Kosher salt. (Yes, they already had an abundance of sodium, but it was necessary to help kill the sweetness.) 

I popped them in the oven for a light toasting. After that, they were at least palatable. 

Breads off the shelf have more sugar these days. You really have to watch for it. Read every label. Reject breads that have added sugars (unless it is the type that is supposed to be sweet). Consumers can turn this awful trend around. 

Is it a trend? Seems to be. Remember that companies invest a lot of money in research and development to manipulate your tastebuds so you'll get hooked on the flavors and continue to buy their products. That's no secret, but not everyone is aware of it. 

New York Bakery's Bread Sticks are: 

Baked in Ohio by the T. Marzetti Company, (whose owners moved to Ohio from New York many years ago and have had a passion for bread making that allegedly stretches back 90 years, according to the box info), and is...in turn, under the umbrella of The Lancaster Colony Corporation. 

Are they baked in Ohio though? The box isn't clear. It just states "baked FOR T. Marzetti," (with the companies address). It doesn't say baked IN Ohio for T. Marzetti. So that's up in the air. They might be baked in another state. I looked for the info online, but I didn't go down that many rabbit holes to find the true source. It wasn't on their page or the Lancaster page. 

Anyway, here is my recommendation: 

DO NOT BUY. If you do, be prepared for disappointment. Unless, of course, you are a fan of SWEET garlic bread. Ugh! 


Monday, August 23, 2021

Costco Product Review: Mission Hill Bistro's Smoked Beef Brisket Burnt Ends


Mission Hill Bistro Smoked Beef Brisket Burnt Ends

It was inevitable. The brisket burnt ends were going to end up in the shopping cart at Costco sooner or later. They made it in during the last trip. 

Here's a shot of the back of the package...


 Burnt Ends Blues
First I have to address what's on the package. Take note of the label on the bottom left. $9.59 a pound, 1.52 pounds in this package. The total price is $14.58. 

Okay, so this is something that gave me pause right away, because there is sauce included in this package, but it is not weighed separately. There are 4 servings in this package, according to the line under "Nutrition Facts." 4 servings at 1 cup each. 

Burnt ends at $9.59 per pound...not a bad deal really, since the burnt ends are one of the best parts of a brisket after you've smoked it. Right? Not something you would want to eat on a daily basis, obviously, but once in a while is okay. 

I weighed the burnt ends and the sauce packets separately to see if it was indeed a "good deal." The package of burnt ends came in at just a shade over 1 lb., 1 oz. The sauce packet weighed 8.3 oz. What?! Yes, 8.3 oz. So that's approximately $4.98 for the packet of sauce. That is ridiculous. Definitely not a good deal on the sauce. 

My first question for Mission Hill Bistro is: Why is sauce included with the burnt ends in the first place? Burnt ends never require sauce. They are eaten just as they are because they taste great. I have never had a burnt end in my life that I had to put sauce on. Of course, those were fresh from the smoker, but still...

So I have a big issue with this sauce packet. Just to be a good sport, I decided to try the sauce with the burnt ends. Okay..."hell to the no" on that! The sauce is sickeningly sweet. I suppose they thought eating it with the burnt ends might balance things out. Well...NO! It doesn't. It's still too sweet. Too bad, too, because if it wasn't so sweet, it would actually be pretty good. It has a nice "afterburn." Still not worth $4.98 though. No way. Now we are stuck with leftover sauce that is too sweet to eat. I will have to modify it for use in another recipe because I hate to waste food.  

The burnt ends themselves weren't that bad. If you crisp them up a bit, you can "fool" yourself into believing they were fresh out of the smoker. Well...almost. The kitchen certainly had that lingering odor of smokiness that occurs when you prepare a brisket at home. 

The bottom line is: The burnt ends are okay. Nothing to write home about, but certainly edible. They taste much better without the sauce, as burnt ends should. They are NOT a good deal, though, because they are packaged along with the sauce. If the packet was only 4 ounces or so, I could let that slide. But not this 8.3 ounces of sauce. No way. Too much $$$ for what's basically BBQ "syrup." 

If you have money to burn, though, go for it! I think it would be cool to get the Mission Hill Bistro Sliced Beef Brisket (read my review here), along with the burnt ends so you could have the best of both brisket worlds at the same time. Party down! It would be a good idea to make your own sauce though, (for the regular brisket, not the burnt ends, of course). 

I have to rate this one, reluctantly, three chicken legs. It would have been two, but they get a freebie just for having the gumption to offer brisket burnt ends to the public. This means they are paying attention. The sauce though? πŸ™„ Cost ya' two legs, Mission Hill Bistro! 

πŸ—πŸ—πŸ—

Now, here is a visual presentation of the burnt ends and the progression from the removal from the package to the final form before consumption: 

Opened Package...


Where's the beef? πŸ˜†


Here's that &%#@*%&$!! sauce packet. 😑


Big lump in the pan with a bit of oil.


Breaking up lumps


Breaking them up some more

Added a shot of water. Just a small shot.


Hmmm...


 Looking better...maybe?

Final Form

Saturday, August 14, 2021

Cinnamon Roll Adventures


I finally got a chance to make some cinnamon rolls again. This time, I made them using the recipe from King Arthur Flour's website. The recipe I used included the tangzhong method, in which part of the flour is cooked with milk or water (or both) on the stovetop until it thickens. This method results in softer breads, and helps them to stay fresh a little longer than other methods. I love to use this method for rolls and loaves of bread, so it was no issue to use it for cinnamon rolls. 

The rolls were very good. The dough was very easy to work with after mixing, and especially after the first rise. The only thing I wasn't happy about was the cinnamon, so I embarked on a cinnamon hunt to find some cinnamon that was just a little more potent. I never gave it a lot of thought before because I don't use it that often. Besides cinnamon rolls, I use it in oatmeal once in a while, spice cake, and of course in November for pumpkin pie. 

So I gave myself a crash course on cinnamon. I'll have to do a post on cinnamon in the future because I am supposed to be reporting on rolls here. πŸ˜† Since I made these rolls the other day, I have purchased Ceylon cinnamon and Saigon cinnamon for future batches, (which will be in the near future for sure). 

The next batch I'm planning will be made using my grandmother's kolache dough recipe. She used her kolache dough for cinnamon rolls too. Her cinnamon rolls totally rocked! I haven't used her recipe in a while. Last year I made a Keto version of cinnamon rolls and a Swedish version. I think cinnamon rolls should be made more than twice a year, and I am going to get into the habit of making them more often. 

I do recommend the King Arthur recipe. Try it out when you get a chance. Don't be intimidated with the tangzong method. It was weird for me when I first started using it, because I had only cooked flour when making choux pastry in the past. I was just used to using standard bread recipes, so it took a little adapting. I don't use it for all breads, but I do use it pretty frequently now. Click here for the King Arthur cinnamon roll recipe. 

The only thing I changed in the King Arthur recipe was the icing. I didn't use theirs. I made one with cream cheese using 1 stick of butter, 1 brick of cream cheese, 1 tsp. vanilla, 2 cups of powdered sugar, 1 tsp. of cinnamon, and just a bit of milk or cream, (depending on what thickness you prefer). 

Oh! I almost forgot to mention: KA's recipe doesn't have any sugar. I did add 2 tsps. of sugar, but only to feed the yeast and allow it to bloom before I mixed the dough. 

The cream cheese icing I mentioned above works really well with the KA recipe. The dough isn't sweet, and the brown sugar used for the filling along with the cream cheese icing I mentioned above gave the rolls a very nice balance. They just needed more cinnamon. 😁

Saturday, August 7, 2021

Fun with Food in Fiction


Larry Underwood Eggs

Food in Fiction

I'm sure I'm not the only person on Earth who enjoys recreating a meal from a book or a movie. I think it would be great fun to have a club dedicated to recreating fictional meals. I'm sure clubs like this exist somewhere, too, but not here, unfortunately. That would be the ultimate book club - have a little potluck with the meals in a book when it's time to discuss the book (assuming that there is any food in the book, or maybe the rules would be that books with meals must be chosen for the club to read. Yeah, that's better). 

One simple dish I like to make sometimes is "Larry Undewood Eggs," as in the photo above. Minus the Debussy playing in the background as it was in the book. (The Stand.)

There are quite a few food items or meals mentioned in that book. Mother Abagail's fried chicken that she made for the guests that she knew were coming, the pork chops, the ears of fresh corn; Frannie's strawberry-rhubarb pie; Nadine's Stroganoff casserole; the meals Nick made for his prisoners, so many options! (Yeah, but we can leave out Lloyd's desperate meal of rat tartar and Flagg's rabbit, lol.)

I also like to "take part" in Dennis and Arnie's leftover Thanksgiving turkey ritual in Christine. The scene in the book was something that harkened back to their boyhood days and made Dennis realize he needed to take action to help his best friend. So I'll have leftover turkey on Wonder Bread with mayo...sort of a double nostalgia thing, my nostalgia for their nostalgia. 

How about movie & tv food? Let's skip the scene in Demolition Man with the burger. πŸ˜‚ It was funny, though. How about the scene in Twister instead: seared steak, mashed potatoes, and gravy "that is in its own food group." Oh, and all of the food in The Sopranos. Yeah! That's the ticket! 

There are so many examples, it's impossible to list them all here. But it is a fun thing to do in the kitchen sometimes. If that makes me a weirdo, so be it! 

How about you? Do you have any favorite book, movie, or tv food you like to recreate? 


Thursday, August 5, 2021

And Now, Another Episode of: "So Many Sausages, So Little Time," featuring -- Eckermann's Sausage


 I got three words fer ya, Pod'nah...Eckermann's Hot Links! 

A Sausage for Every Occasion

We're very fortunate because we live in an area where sausages are prolific. I can name several towns, all within an hour's drive from here, where sausages are made and sold. Some of them carry the name of the town, or the family that owns the company, others have more colorful names. Most of them are pretty darn good. But...then there's Eckermann's. 

When I was growing up, Waak Sausage was a regular in our family. It was the perfect sausage, the flavor was unsurpassed. The grind was just the right size, not too big and not too small. They used a lot of mustard seed in their "secret" mix, and smoked the sausages just right. We had them all of the time at family barbecues. My grandma used them when she made klobΓ‘snΓ­k (a.k.a. sausage kolache). But, if Waak's was not available for some strange reason, Eckermann's took up the slack. 

My great uncle had a meat market and made smoked sausage, but we still preferred Waak's over his. The rest of his offerings, including summer sausage, were great! But his sausage always fell short with us for some reason. The flavor was off...it was either missing something or it had an ingredient that just wasn't agreeable. So we stuck with Waak's. 

Alas! Waak Sausage is gone now. They closed down some years ago. The buildings are still there, but they house some other meat market now. So Eckermann's inherited the throne, at least in our house. Sausage perfection! 

We don't eat a lot of sausage these days, but Eckermann's is definitely the "go-to" when we do. Usually we get the pork version. I couldn't find it last time, so I picked up some hot links instead. It was a great choice! They have just the right amount of heat. 

Around here we like REAL sausage, not that "pink slime wannabe" poser. (I'm not going to name any names, but they used to run a lot of ads on tv, and probably still do.) 

If you're ever in this area, make a plan to do a "Sausage Tour." First, just go to our local Mom-n-Pop grocer in town because they carry a lot of sausages from different companies there. Then map the rest out accordingly. Yes, they DO have several varieties of Eckermann's, including dry sausage. 

If you don't live around here, fear not! Eckermann's has a website and they will ship sausage to you if you order at least 10 pounds of their product. That is SO easy to do. Just order one of each variety. I'd skip the head cheese version though, because I'm not a fan. But if you are, hey! Go for it! 

I rate Eckermann's Hot Links at 5 out of 5 stars! It even passed the "White Bread Test." If you get a chance to try some...do it! Dooooo iiiiiit! 

⭐⭐⭐⭐⭐

Monday, August 2, 2021

Recipe: Nan's "Knock Your Socks Off" Potatoes


Get your fork! We're ready to Rock-n-Roll!!!

A Little 'Tater Background

This is a recipe my maternal grandma (Nan) used to make on a regular basis. She was Czech, but I don't know if the recipe was a Czechoslovakian method of cooking or if she just started cooking them that way herself. She had so much energy for so many things -- she worked from sunup to sundown with hardly a break. She wore many hats: mother, grandmother, great-grandmother, gardener, baker, cook, seamstress, volunteer...those are just a few examples. She always made sure none of us went hungry. She always had something available for us, as well as any visitors, whether they were invited or just dropping in for a quick visit unannounced. 

She liked to challenge herself in the kitchen and one her challenges was how quickly she could get a meal prepared. She liked to get lunch prepared in 30 minutes, and she would time herself. Dinner might take a little longer, depending on her mood and whatever she had in the baking queue on any particular day. That could be why this cooking method for potatoes was a favorite. My grandpa was German and he loved his meat and potatoes, so I'm sure that factored in as well. 

I don't have any real measurements for this recipe, I just make them from what I learned by observing her method. The best I can do is try to get a measurement on how many pounds of potatoes are used next time I make them. 

This recipe is best with fresh, red potatoes, but any waxy potato variety will suffice. You can use starchier potatoes (like Russets), but the end result will be different, because waxy varieties of potato hold their shape better. However, I would recommend starchier potatoes for this method if you are planning to make mashed potatoes, because it removes a step and saves time. 

Another great thing about this method is that all of the nutrients in the potatoes are retained instead of going down the drain. But be warned! These potatoes are SO GOOD, that you'll be tempted to forgo all of the other dishes and gorge on these potatoes! They are so good, I almost fall over every time I eat them. The flavor will knock your socks off! 

Recipe

A large frying pan is crucial for this recipe, unless you are only cooking for one person. Actually, go ahead and use a frying pan anyway, because you will absolutely want to have leftovers for the next day. (If you are able to control yourself, that is.) 

  • 1 frying pan: 10", 12", 14" - it depends on how many servings you'll need. We usually use a 10" or 12" and that will make 4 reasonably-sized servings. 
  • Red potatoes (or any waxy variety) as needed
  • 2-3 Tbsps. Cooking oil (light olive oil, canola, or vegetable oil)
  • 1-2 Tbsps. unsalted butter
  • S&P (to taste)
  • water (as needed)

1. No need to peel potatoes. Wash, trim any bad bits, then cut into bite-size pieces. Use as many as needed to cover the bottom of the pan.

2. Place potatoes in a single layer in pan. 

3. Add water just to cover potatoes (see below), then add oil and butter. (or just add oil & add the butter after potatoes are done.)

4. Add S&P. Stir to combine. 

5. Bring to a boil over high heat. 

6. Turn heat down to about medium-high. Stir potatoes once in a while. 

7. Test potatoes, and when they are about "al dente," turn the heat back up to high and cook until the water evaporates (au sec). The potatoes will form a small amount of sauce with the oil & butter. Add more butter if you wish.

8. You can eat these just as they are, or allow them to brown a bit. They are spectacular either way. 


Boil Those Beautiful Babies!


Cook to au sec.

Add a bit more butter if you like & stir until mixed.


Rock-n-Roll!!! 

Sunday, August 1, 2021

Costco Product Review: Safe Catch Ahi Tuna - An Encore Performance


Ahi Encore

Too bad it's not albacore tuna, then I could have titled this: "Encore for Albacore." πŸ˜†

I popped open what I thought was the last can of this lovely tuna yesterday. (Turns out there was another hidden in the food safe, so we're not out just yet.) 

I decided to make the classic "Tuna Salad" with this one. As promised in the  original Safe Catch review, I took a picture of it after I took it out of the can and before I crumbled it up: 


Not very impressive, huh? Don't let that fool you. 


It gets even better...


Look at those lovely chunks! 


And here it is, shredded and ready for the rest of the ingredients. The difference this time is: I did not drain the tuna. I was doing some reading on the Safe Catch website and there was a mention about leaving the liquid in to be absorbed after the tuna was shredded for use. Out of habit, I drained the last can and let one of the tuna loving doggies have the "tuna juice." (I had to give her a consolation prize this time.)

Tuna Salad

When I make tuna salad, I do it one of three ways depending on mood: 

1. I add mayo, a little lemon juice, and S&P (maybe just P-it depends on the tuna)

2. I add mayo, mustard, chopped pickles, a chopped hard-boiled egg, a dash of Tabasco, a little lemon juice, and S&P. 

3. I make "PMF Tuna Salad." I'm not going to translate that here because I'd like to keep the blog "Rated PG," so use your imagination or send me an email. πŸ˜„

For PMF Tuna Salad, see the pics below. I add chopped pickles, chopped egg white, and employ a special method for the rest of the ingredients. 

This is it: 
  • I mash the egg yolk in a separate bowl... 
  • Add 1 to 1 1/2 Tbsps. mayo, (Duke's Mayo is the current reigning champion in this house)
  • Add 1/2 to 1 tsp. Dijon mustard 
  • Add a couple of squeezes of lemon juice (maybe 1/2 to 3/4 tsp.) 
  • Add  about 1/2 tsp. Worcestershire sauce
  • Add a dash of Tabasco
  • Add 1/8 to 1/4 tsp. of shaved/pulverized onion (red, but white will do) 
  • Add 1 to 1 1/2 tsps. Extra Virgin Olive Oil (omit this step if tuna is packed in oil)
  • Add S&P
As for the onion, what I really go for is the "essence of onion." Just a few drops of onion juice -- it's not even necessary to have pieces or onion pulp. But under no circumstances should chunks of onion be allowed. If it's terrible tuna, that's one thing. But not for this tuna. We want to showcase the wonderful flavor, not kill it with too much onion. 

If you like your tuna salad to have even more of a crunchy texture (aside from the pickles), you can add a tiny bit of celery to it, but not too much. Try to add something that's a little more bland for texture, like chopped water chestnuts. Celery and I are always on shaky terms, as you can read here: "The Atrocious Fetor of Celery."

I only use one hard-boiled egg per can of tuna when I make tuna salad. (You know, if I wanted an egg salad, I'd make an egg salad.) 2 eggs per can is just too much for me. Of course, if food was scarce and the tuna salad needed to be stretched. I would use more than one egg. Absolutely. (BTDT, got the shirt.) I'm picky about certain food items and at present, I'm fortunate enough so that I can be picky about it. Hence the title of this PMF Tuna Salad. I'm sure you'll be able to figure out the rest of the words now. πŸ˜€


Stir all ingredients until well incorporated...


Then add the "PMF Dressing" to the tuna and the other elements and mix well. 

Add more mayo if that's your wish, but I always abide by the "Rule for Salad Dressings" and simply "cloak" the ingredients with the dressing, rather than drown them in it. 

That brings to mind a local eatery here that makes a delightful broccoli salad...or it would be if the vegetables weren't screaming for lifesaver rings because they're drowning. Okay, it USED to be delightful, but someone decided that it needed more dressing (it doesn't). I haven't ordered it again since that happened though. Maybe it was simply a mistake. 

So CLOAK your ingredients, Folks! Do you want to end up on the local grapevine? 

Gossip Hound #1: "She offered me a tuna sandwich, but I couldn't find the tuna!"

Gossip Hound #2: "Really? We have to warn everybody!" 

Okay. I digress. Let's carry on, shall we? 

Tuna cloaked in PMF Dressing


Grand Finale

This tuna salad called for an unobtrusive bread...not a bread with flavors that would overpower the taste of the tuna, i.e. - "a bread that's better for your health." I'll try it with healthier bread eventually, but this time I used plain ol' Wonder Bread. I use it on occasion when I want to taste the ingredients more than the bread (like with PB&J). 

Was it good? It was VERY good. Was it better the next day? Oh YES! So make it the night before you'll use it, if you can. That usually works if you're making it for a party or something, but if you're like me, when I crave a tuna sandwich, I want it immediately, so in that case...just make plenty so you have leftovers! 

PMF Tuna Salad on "Throwback" Bread
Served on a practically vintage platter

Happy Eating! 

Friday, July 30, 2021

Waking Up to Excitement with Tiramisu Cookies


I woke up and checked email this morning and found that my recipe for Tiramisu Cookies was chosen to be featured on...wait for it...Delishably.com! 

In the interest of taste buds everywhere, I will get back in the "laboratory" as soon as possible for more sweet experiments. 

This is happening at a time when Texas temps are getting higher, I'm still fighting to catch up with yard work thanks to the unusual rain amounts we experienced last month, and my workload for process serving is increasing by the day. *taking a deep breath*

That's just daytime hours though. There's plenty of time in the wee hours to conduct experiments in the lab! 

Here is a link to the full recipe for my version of Tiramisu Cookies: 


If you make this recipe, drop me a line either here or there to let me know how you like it. If you need any help or troubleshooting with the recipe, let me know! I really need to make a picture tutorial for this one as well as the Bienenstich Cookies. That's on the list too, so keep an eye on this space. I'll get there! 

Thursday, July 29, 2021

Kitchen Tip: Food Hack for Leftover Quiche

 What Can I Do with My Leftover Quiche? 

So you have some leftover quiche, but there's not enough to go around because you had some unexpected guests drop in around lunchtime? 

Here's what I did with mine. I threw it in a frying pan with just a small amount of butter -- (oil is okay too, but butter...well...you know), and chopped it up with my spatula while heating to make sure it was heated through. Then I served it on flour tortillas for a quick, "no hassle" meal. 

*Note: The quiche I used was a quiche that had a "self-forming" crust. I suppose you could do it with traditional quiche, since we live in a world where some people don't mind extra starch on their sandwiches, tacos, or burritos. (Like French fries inside a burger, or a flour tortilla with 100% potato filling, etc.) 

Just add your favorite salsa. No extra cheese required! 

Spinach & Mushroom Quiche Breakfast Burrito 

Tuesday, July 27, 2021

Costco Product Review: Safe Catch Ahi Tuna


This tuna is outstanding! 

I'm sending a huge, "Thank you!" to Costco for making this product available. 

There is nothing in the can except tuna that was cooked in its own juices, and a little sea salt. The flavor is out of this world. This is easily the best canned tuna I have ever had thus far. 

It knocked my previous favorite, tuna in a glass jar, down to second place. Now that one was good. REALLY good, but this one is so much better! 

I will be picking up a jar though, so I can do a side-by-side comparison of these two, just to confirm. We can't get it locally, but on the next H.E.B. trip, I am making a beeline for that jar. I found out that some H.E.B.s carry the Safe Catch tuna too, so I'll be looking for that as well. 

I have some pics below. I should have taken a pic before I separated it in the bowl. It was indeed a tuna steak. It was fabulous "as is," so I didn't want to add much to it on this first go round. I just added a bit of S&P, a little lemon juice, a dash of extra virgin olive oil, and about a tablespoon of mayo. (Duke's).

I had to stop myself from eating more than one sandwich. It didn't need any accompaniments either, like tuna usually does. 

Simply excellent! 

I visited the company's website and found that they also have salmon, sardines, and mackerel, made the same way. If you order from the site, ground shipping in the U.S. is free. They also sell pouches of tuna and have a recycling program for those: Send the empty pouches in for them to recycle and they will reward you with a coupon to use for ordering from their website. 

Check the website out by clicking on the link below: 


Here is a photo of the tuna: 


And a photo of the tuna after I added the few ingredients mentioned above:


The Label


They are serious about the quality of their product, and it shows. There is no BS about this product. The proof is in the taste. Get some as soon as you can and try it! 

Happy Eating! 

Sunday, July 25, 2021

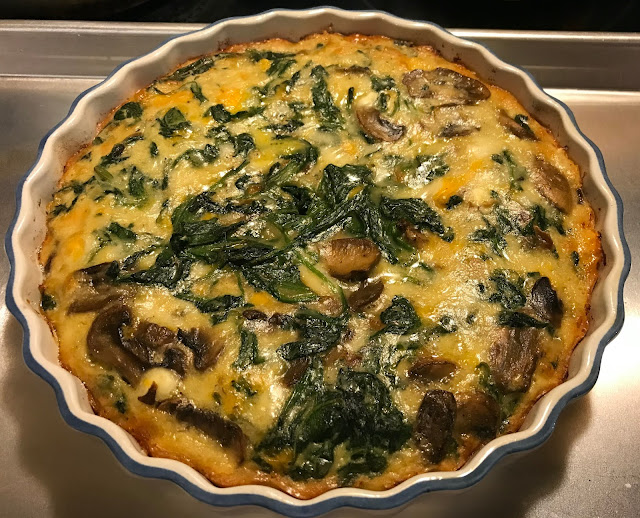
Recipe: Spinach & Mushroom Quiche With Self-Forming Crust (Picture Tutorial)


Spinach & Mushroom Quiche
(with 6 cheeses)


Quick-n-Easy Recipe

This recipe is great for a quick meal with a simple salad as as side. Preparation moves along pretty quickly, you can reduce the prep time a bit if you buy sliced mushrooms instead of whole. 

First, gather your ingredients and tools: 

  • 8 oz. fresh mushrooms (Button or Baby Bella), sliced 
  • 10 oz. fresh spinach 
  • 1/2 medium-sized red onion, sliced thinly
  • 1 clove garlic, minced
  • 1 cup Muenster or Mozzarella, shredded
  • 1/2 cup Mild Cheddar Cheese, shredded 
  • 1/4 cup Feta Cheese, crumbled
  • 5 egg yolks
  • 1 whole egg
  • 2-3 Tbsps. light olive oil (or melted butter)
  • Cooking oil spray as needed
  • 1 cup half & half, (or make your own with 1/2 cup heavy whipping cream + 1/2 cup milk)
  • 1/2 cup AP flour
  • 1/2 tsp. baking powder
  • 1/4 tsp. cayenne powder, (optional)
  • S&P to taste (plus a couple of pinches during veggie sautΓ©)

Over low to medium head, sautΓ© Onion


I like to slice into 1/4" thick slices, but you can slice a little bigger if you want. 

Chop Garlic


While onions are sautΓ©ing, mince garlic. I usually use a garlic mincer, but lately I have been opting to use my chef's knife instead. 

When onions look like this...


...add garlic to pan


Your onions should be pretty pliable when you add the garlic, and a little caramelized. You can let them caramelize a little more if you prefer. After adding garlic, sautΓ© for 30 seconds to 1 minute before adding next ingredient. 

Add sliced mushrooms


Toss mushrooms with the rest of the ingredients, then sprinkle with a pinch of salt to help the mushrooms release their juices. (I always use Kosher salt in my recipes, with a few exceptions.)

When the mushrooms look like this... 


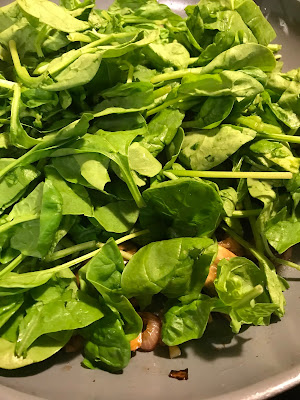
...add 1/2 of the fresh spinach & toss with the other ingredients 


After the spinach wilts a bit...


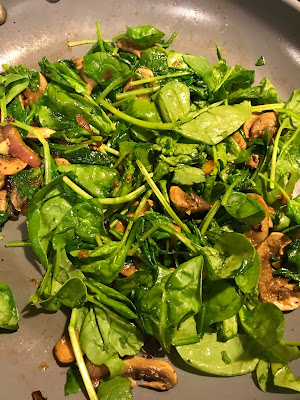
Add the rest of the spinach & toss with the other ingredients...


SautΓ© until spinach is completely wilted. 


Sprinkle with another pinch of Kosher salt while sautΓ©ing. The spinach needs to wilt--so no need to cook it any longer after that, since it will be cooked again in the oven. Just set it aside to cool. (If you opt for frozen spinach, thaw it out ahead of time and squeeze as much liquid out of it as possible by using spoon and a sieve.)


At this point, set oven to 400° and prep the rest of the ingredients. 

Grate your cheeses


I ended up with six cheeses in this quiche: Swiss, Monterrey Jack, Cheddar, Mozzarella, Asiago, and Feta. The total amount was pretty close to the total amount in the ingredients list above, though it may have been a little more. You can mix it up any way you like -- using white cheeses with spinach is my personal preference. The feta is really optional, but do use it if you have it. It adds extra little pops of intense flavor. 

Prepare  the batter


Whisk flour, baking powder, salt, and cayenne together in a mixing bowl until well combined.


Add 1/2 & 1/2 to dry mixture and whisk together, then beat eggs in a separate bowl until well mixed. Add eggs to batter and whisk until thoroughly combined. (*Note: In the interest of saving time, I used 3 whole eggs this time, instead of 5 yolks and 1 whole egg.)

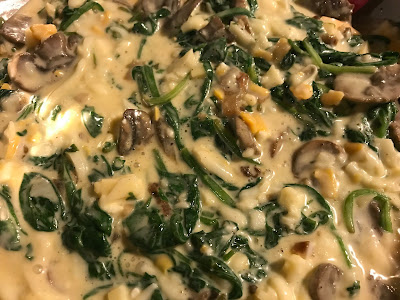
Fold in the cheese


Add vegetable mixture...


...and fold in until completely incorporated


Pour mixture into oiled, 10" quiche pan


I usually place the quiche pan on a cookie sheet before sliding it into the oven. If you don't have a quiche pan, don't sweat it. Just use a deep dish pie plate or a similar shallow baking dish. I only have a 9" quiche pan, so I made a mini quiche with the leftover raw material (I just didn't bake it quite as long). 

Bake at 400° for 10 minutes, then kick oven down to 350° and bake for an additional 25-30 minutes. You know your oven, so check it near the end of cooking time. Test it with a toothpick or a thin knife. You shouldn't see any egg (though you might see some cheese). 

Let your quiche cool for 10-15 minutes...


...then enjoy with a salad or other side dishes.

Let me know if you enjoy this recipe. If any part of the instructions isn't clear enough, or you notice any errors, just drop me a line. 

Happy Eating! 😘