Showing posts with label savory dishes. Show all posts

Saturday, November 18, 2023

Excellent Potato Recipe (No Draining) - Make Them For Thanksgiving Or Any Ol' Time!


Nan Taters in Action

I have posted about this potato recipe before, but it bears repeating, because they are so good! I have searched the internet trying to find a similar recipe, I know there must be some out there. The closest recipes I have found using the "evaporation method" are recipes touting "Syracuse Salt Potatoes," and an almost identical version from Colombia. Both of these use approximately 1/2 cup of salt per pound, and involve whole, small potatoes. (And I am definitely going to try those recipes.)

But this recipe is not the same. While you can use whole, small potatoes, bigger potatoes can be used as well. The best potatoes to use are waxier potatoes (like Yukon Gold, or New Potatoes). About a teaspoon of Kosher salt is used, along with 2-3 Tbsps. of oil during cooking. Butter is added after they're done. 

My Czech grandmother, "Nan," made this recipe often, so I dubbed them "Nan Taters." I don't know if she saw it somewhere, or if she just decided to do it to see what would happen. She did do a lot of experimenting in the kitchen, so I think it might have been the latter, unless someone in her family made them in the past. Unfortunately, I can't ask her now, and back then asking didn't occur to me. All I knew was that they were really, really, really good...I could never get enough of them, and I could have easily eaten a whole pot of them by myself (and I could have gotten away with it with no calorie regrets too, at that age. ๐Ÿ˜„) 

Once in a while she would fry them directly after the evaporation process, but most of the time she would leave them in the "sauce." She made a German version a lot too, since my grandpa was German. She probably made every version imaginable, and then some, because he loved to have meat & potatoes every day. 

For this recipe, the potatoes from her garden were used until the supply ran out. She grew a LOT of potatoes! These were the absolute best ones to use, but using store-bought potatoes works really well too. 

I thought maybe there was a Czech or German tie to this recipe, but I haven't found one yet. If you have made these, or have family members who have, please let me know. I really thought I would find pages and pages of this recipe because it is SO GOOD. But...nope, and I used many different search terms. More people need to try this recipe, IMO, so I am posting it here again. 

Well on the way to creamy goodness!

Tools: A saucepan/frying pan, 10-12 inches (or larger, if you want a really big batch).

Ingredients: 

Yukon Gold or New (Red) Potatoes (amount depends on size of pan)

Water to cover

1 tsp. salt

2-3 Tbsps. oil (I use avocado or extra v olive oil)

2-3 Tbsps. of unsalted butter

Ground black pepper (add at will)

Method: 

1. Wash potatoes thoroughly. If you are using large potatoes, cut into bite-sized pieces. Cut enough so there is only one layer on the bottom of the pan (your mileage may vary depending on pan size). 3 medium potatoes worked well in the 10" stainless steel pan that I used.***

2. Add water to cover, the salt, and the oil.

3. Bring to a rolling boil. Crank it up! Once it gets going it almost sounds like applause.

4. Stir once in a while. Once your water has almost completely reduced, test one of the pieces to see if it is done. If not, add a little more water and cook longer. Repeat if needed until the taters are tender. 

5. The "sauce" is made from the starchy water, so don't let them evaporate all the way unless you are planning on frying right away. If you want the creamy version, let the "sauce" remain and add the butter & pepper. Stir well & add more salt if needed. You can make it as thick or thin as you like. (Just add a little more water if you think your sauce is too thick.)

From here you can serve them as is, or add cream or milk and mash them. The flavor is out of this world good, and all of the nutrients remain instead of going down the drain.

I confess that I made some last night and there were no leftovers. I just called my last portion "dessert." ๐Ÿ˜†

***NOTE: I did not rinse the potatoes after cutting like I usually do. You can do that if you feel the need. There will be less starch after evaporation, but it will still be enough to make the "sauce."

So here they are again. Give them a try and let me know what you think. If you have any issues, or my instructions aren't clear enough, just let me know and I will fix them. The finished product should be so good that you could eat the entire batch by yourself. If that is not the case, notify me immediately so we can troubleshoot!

And again, if you have info about other versions of this recipe (if you make it or know anyone who has), please share it with me! I love food history & I would like to know why I have never seen it on a restaurant menu anywhere.  It could easily be held on a steam table until service, like some other potato recipes. 

Thank you! ๐Ÿ˜Š

Creamy Goodness Right Here!!!

Friday, November 10, 2023

Product Review: H-E-B Bakery Tortilla Chips


Ahhhh...H.E.B. Bakery Tortilla Chips...they come in handy when we have leftover taco filling but don't want to open another package of crunchy taco shells. 

These chips are light, crispy, and delicious! 

Great for taco salad, dips, chilaquiles, or crushed & used as a coating for chicken (or fish). 

Bonus! You don't have to worry about these being "recycled" (like some restaurants tend to do). ๐Ÿ˜

The H.E.B. where I found them had 3 varieties: unsalted, sea salt, and chile limon. So far we have tried the unsalted & sea salt versions. No complaints at all!

Many years ago there was a company that made these & they could be easily found in grocery stores, even in our little town. Then either the company closed, or the chips just lost their luster for shoppers. Maybe "Santitas" killed them, but I can't imagine why. Santitas are some of the worst tortilla chips on the market. 

Big thanks to H.E.B. for this offering! 

Saturday, October 28, 2023

Recipe: Green Bean Casserole - The Stovetop Method; A Holiday Shortcut

I started thinking about a stovetop version of green bean casserole a few months ago. I decided to try it out just for the heck of it to see if it would be as good as the oven method. Finally got a chance when I happened to have 1/2 can of mushroom soup hanging around, along with an open package of crispy onions that needed to be used up. So I decided to go for it, using one can of green beans. 

This method can come in handy, especially around the holidays when and oven gets a workout and some dishes have to take turns. Also great if you don't have an oven, or if you get a craving for this dish but don't want to heat up the kitchen with the oven. If you have a microwave but no oven, you can still use part of the recipe, because obviously the crispy onions MUST be toasted. It's just not the same if they aren't. 

Also, some things just don't work well in the microwave. I have started this dish in the microwave & finished it in the oven before, when time was short, but there wasn't a problem doing it that way. Microwave only? No way! 

Sometimes I see posts that mock this dish, but I would really miss it if I didn't have it at least once during the holiday season, or for cravings at other times of the year. Nostalgia food. Comfort food. All good as long as you don't make it a weekly habit. ๐Ÿ˜

It turned out really well on the stovetop, next time I will let it simmer a little longer, but other than that, it was very satisfying with the crispy onion topping. 

First: toast your onions. I used a stainless steel pan and it worked just fine. A bonus with this method is you can leach some of the oil out of the onions if you let them rest on some paper towels while you prepare the rest of the dish, and leach out a few calories too. ๐Ÿ˜† Otherwise, just put them in a bowl & set aside. Also, if you like them darker, go for it. These were dark enough for me after toasting.

Before Toasting


After Toasting

Next, wipe out the pan out with a paper towel, (or not). There will be bits left in the pan from the onion toasting. I left those in. Add the soup & milk. Add a little pepper, mix well, drain beans, and add those in. Let this simmer & reduce for a few minutes.


Add part of the crispy onions. I always save as many of the onions as possible for the crispy top layer. Too many in the soup layer can get a little funky anyway. 


I always sprinkle extra pepper on the top. Just ignore this if you don't like a lot of pepper. Simmer for a while, let it reduce a little more, Then sprinkle the rest of the crispy onions on the top & serve.


The Result - Success! Still tasty as ever & saves a parking space in the oven for another dish that is waiting in line. 

Sunday, October 15, 2023

Kitchen Tip: Precise Rice Advice


If you love rice and you work with it a lot, you probably already know this, but for those who are occasional rice users, it can come in handy. Sticky rice is great for many dishes, and there are types of rice that produce more starch for things like sushi rolls. But if you want to use rice that isn't as sticky/starchy - in a dish like fried rice, for example, then this tip is for you. 

If you're making fried rice from leftover rice, it's not a problem, because the rice is not going to be as starchy after it has been in the refrigerator overnight. But what if you want to make fried rice for lunch or dinner as a main dish? 

One good way to make "loose" rice is to just make a pilaf. Add a little oil to the pan, sautรฉ the rice until it is coated, then proceed with the recipe (using whatever ratio you need depending on the type of rice you are using). Pilaf is made using an aromatic (like garlic or onion), and a bay leaf too, but you don't need to add those unless you just want to. Just sautรฉ the aromatic for a minute or two before adding your rice. Bay leaf goes in after you add your water or stock.

A faster way to do this is to put everything in your pan or rice cooker, then add 1 tablespoon of oil or butter, then cook as usual. After the rice is done, fluff it and leave the lid tilted so it can dry out a little more. It is ready for action for your fried rice recipe, etc. 

The rice in the pic above was made using the faster method. It was used for a lovely pan of fried rice that we had for lunch. I'll have to post the recipe. It's not traditional, but it is tasty AF. It's one of those recipes where you could just eat the whole pan because it is so good.

It's possible that I might have already posted this recipe somewhere. If I did it was quite a while back & this dish has had improvements (re: the method) over the years, so it wouldn't hurt to post it again. 


Sunday, October 8, 2023

Killer Garlic Bread Recipe


This one takes a little more elbow grease than "cheater garlic bread," but it is absolutely worth it. Use FRESH garlic too, not the one that's already peeled and minced. Fresh

Use your favorite bread, whether homemade or store-bought. This recipe is enough to cover 2 halves of a loaf of French bread. You could do slices as well, if that's what you fancy. 

I used: 

About 3/4 of a stick of unsalted butter. Or you can go ahead and use all 8 Tbsps. Either way, leave the butter out until is softens. Spreadable, but still firm. (It works better this way instead of melting the butter. It's more of a PITA if you melt it, let's just put it that way. Melting is great for spreading the butter, but the minced garlic has to be shoveled on with a spoon & won't spread evenly. So...no. Don't melt it.)

Garlic...I used an entire bulb for this. Use a garlic crusher if you have one. It makes life easier. I also used one of the tubes made for peeling garlic. Otherwise, you'll have to peel one by one with your knife, or smash them to release the peel. 

S&P - I seasoned with Kosher salt & some pepper

Oil - I used 2-3 tsps. of avocado oil

1 tsp. of garlic powder (not garlic salt). Because...why not? 

Mix & mash together until well combined, then slather it on your favorite bread. 

You can add other things too: herbs, your favorite cheese or cheeses, red pepper flakes, (or even more fresh garlic, if an entire bulb isn't enough for you). I was just itching for some good garlic bread, and that was the goal here. 

Toast the halves or slices in your oven until they reach your desired doneness. I let it get a little toasty on the edges, but that was it. I didn't want the garlic to burn. Alternatively, you can put the halves back together and just bake for a bit, but the results are better if you toast the halves, so the yummy garlic butter can melt into the bread. 

A great accompaniment for any meal, but it can also be a meal by itself. That is up to you. All I know is that I really enjoyed the chunk I had for breakfast the next morning. ๐Ÿ˜€


Let's Cook Some Broccoli - A Simple Recipe, A Great Flavor


I still have an issue with the guy who posted a video and tried to convince people that their veggies at home were not as good as they are in a restaurant. It just totally rubbed me the wrong way. He tried to claim that the "secret ingredient" that makes restaurant veggies taste so good is...butter. 

In the first place, I want to know where in the world he is getting all of these wonderful restaurant veggies, because the majority of the time, veggies are an afterthought in a restaurant. They are usually overcooked, undercooked, over-seasoned, or under-seasoned. And by over-seasoned, I mean salty AF. At least with under-seasoned, you can add what you want. 

So, unless you are dining at a 5 star restaurant, (and sometimes not even then), your average side-order veggies are a disappointment. I would say...99% of the time. That has been my experience. Your mileage may vary. ๐Ÿ˜€

Forget what he said. It is just pure BS. You can make veggies at home that far surpass any restaurant veggies. It's the cooking method, not the 5 pounds of butter, that make veggies good. They don't need a lot of adornment, but you can go that way too, once the cooking method is down pat.

Back to the broccoli. Unless I'm planning a broccoli casserole or broccoli soup with the leftovers, I usually just grab a good-looking crown of broccoli instead of a big bunch. That gets us through a meal with maybe enough left over for lunch the next day. (No guarantee on that though. It might all be consumed the very night it is made.) 

Either way, first rinse your broccoli. If you have a designated spray bottle for vinegar that you keep next to the sink (and if you don't, you should), spray it with that first. Then rinse & set it aside for a few minutes. 

For just a crown, I use either a 2-quart or 4-quart saucepan. Fill it 3/4 of the way up, add about a teaspoon of Kosher salt (less if you use granulated salt), and set it to boil. 

Then process your broccoli. Cut the crown into florets, and try to make them somewhat the same size. Cut them in half if necessary. But don't make a big deal out of it, as long as it's mostly uniform, you'll be fine. Peel and dice the stem too. 

Rinse again for good measure, then add to the saucepan after the water has reached a rolling boil. Stir, bring back to boil, then turn down to simmer. It will take 6-8 minutes before it's ready.

The pic above was taken after the water started to boil again. You can see it floats. Pennywise would approve. ๐Ÿ˜€

In this next pic, you can see that the broccoli has started to go below the surface. That's when you want to pull it. Sometimes I let it cook for about another minute once it dips below, but most often I pull it. 


Drain (no need to shock it in ice water), & add a little pepper & maybe 1 tsp. of butter, and toss until coated. Delicious!

Or you can leave it as-is, you use your favorite topping, or use it for soup, casserole, etc. Perfectly cooked, al dente. That's how it should be. If it is olive drab "army green," you are cooking it waaaaay too long!

If you aren't getting results like this with your broccoli, just drop me a line so we can figure out why. 


Saturday, October 7, 2023

Product Review: Rice-A-Roni


Rice-A-Roni...it was introduced in 1958, do we really need to talk about it? Yes. Yes we do. 

I remember the commercial from many years ago, it was on tv a LOT. The San Francisco Treat. Yeah.

Well, it is good. It is one of the food items I don't mind eating cold from the fridge if there are leftovers. 

I don't know how many flavors there are now, but I still like the chicken flavor the most. Second is the "pilaf," if it is still out there. All flavors are made with the pilaf method, but ok, we'll let it slide. 

I mostly want to talk about prep. How do you make yours? Do you follow the instructions on the package to a T? Years ago I started subtracting water and now I only use 1 1/2 cups instead of the recommended...what is it? 2 1/4? No, no, no. That's way too much. It gets too big and "wormy." Stick with less water. It is so much better that way. 

So try it out. I am in south central Texas, so the right amount where you are might be different, depending on the region you live in. 

It's also a good idea to use a 10" pan to make it, rather than a 2 quart pot. 

2 Tbsps. of butter, yeah, it works. You can use oil too, really, but butter kinda hits the spot. Use unsalted though, since it already has a lot of sodium. 

A homemade version of this is actually pretty good too, but you know how it is with nostalgia flavors. Sometimes you just have to have the original. 

Bring it to a rolling boil before you cover an reduce heat. A rolling boil...not a simmer, not a barely boil. A ROLLING boil. ๐Ÿ˜† Yes, one day I will get a camera and post an example of a rolling boil. 

Then when it's done, fluff it, and tilt your lid so steam can escape & it dries out a little more. Then it's munchie-munch heaven. 

Here's another tidbit...I used to get the family size sometimes when we needed extra, but I stopped doing that long ago. The balance of the flavor packet vs. the rice is not the same. I haven't tried it again in a while, but I'm betting it's still the same way now. Just splurge and get 2 regular size. This is not the only product where this issue happens, by the way. 

So far they haven't done anything with it to change it, because why mess with perfection? Each time a company starts monkeying around with a flavor, thinking it has to be "updated" or whatever, it's no good anymore. I have to cite Coke and Wolf Brand Hot Dog Sauce as examples. 

If it's good, leave it alone! At least the Rice-A-Roni folks make different flavors instead of ruining the original one. I give them 40 thumbs up for that! ๐Ÿ˜†


Friday, October 6, 2023

Recipe - Sausage Kolache or Klobasniki: I Don't Care, Just Give Them To Me!


I'm not going to "ding" anyone for not using the proper term for these lovelies: Klobasniki (Klobasnik or Klobasnek for singular). Growing up, we were very fortunate to have access to these very frequently, since my Czech grandmother was such a prolific baker. We knew the proper term but almost always called them "sausage kolache." (Kolach - singular; kolache - plural.) Did we call them kolaches too, instead of kolache? Yes we did. ๐Ÿ˜„

Anyway, I made a batch not long ago using Eckermann's Sausage (made in New Ulm, Texas), which has been my "go-to" for these for a very long time. Waak's used to be a favorite local sausage, but unfortunately they are not around anymore. 

You can use your favorite sausage for these though. They are just better if you get your sausage from a local purveyor who knows their way around a sausage, if you have one available. 

I cut the sausage into 8 pieces and then cut each piece in half. Initially I was going to make 8 big ones. I decided to go for a smaller size & try to get a better balance of sausage:dough. 

Instead of making dough balls, I rolled out the dough & used a standard size (household) biscuit cutter. But you can use whatever method you like. I did it this way and had some dough left over (which is always fun).

Ingredients:

3 to 3 1/2 c flour (dip, level, pour method)

1 large, room temp egg

1 c milk 

5 Tbsps. butter, melted

3 tsps. instant yeast

3-4 Tbsps. granulated sugar (I only used 3 for this batch - 1 to feed the yeast, and 2 for the dough)

1 tsp. salt (I used Kosher)

1/4 c plain potato flakes (or cook a small potato, mash, & use 1/4 c)

Method: 

You can also mix it in a stand mixer if you like, but I like making the dough with a "minimal kneading" method. 

It's no big secret. I just take advantage of the "autolyse method," where the flour & water are combined and allowed to autolyse before the other ingredients are added. I add all of the ingredients together and then "autolyse." I might get "dinged" for this by others, but I don't care. It works, and I have not had any issues doing it this way. I use the method for regular bread dough as well as kolache dough (with eggs). 

First this though: Always bloom your yeast! It doesn't matter if you're using Active Dry yeast or Instant yeast...always bloom/proof it! It serves more than one purpose. It ensures that your yeast is alive, and that it will dissolve completely into the rest of the ingredients. If you don't bloom it, you might end up with dry yeast granules in your recipe and that just sucks. 

So here's what I do:

Add 1/2 cup milk, yeast, and 1 Tbsp. of sugar together in a bowl. Mix & let rest until it blooms, 5 or 10 minutes. You should warm the milk first if it's straight from fridge. For this batch, I actually used 1/2 c filtered water (room temp) for this batch, and then 1/2 c milk later. You'll know your yeast is working when you get a nice spongy, foam on the surface. 

While you're waiting for the yeast, melt the butter & let it cool slightly. Crack the egg into a bowl & scramble it. 

After the yeast has bloomed, add the rest of the liquid (1/2 milk), the butter, and the egg. Add the flour, 2 Tbsps. sugar, 1 tsp. salt, and the potato flakes. Mix well with a spoon (or a Danish whisk, if you have one). If it seems a little dry, add 2 or 3 Tbsps. water. 

After everything is incorporated, cover and let the dough rest about 20 minutes, then do a series of folds 2 or 3 times. If you have a dough scraper, it makes that job easier. Just pull it up and over, rotate the bowl, pull up and over again, then rotate again, etc. 

Cover & let rest another 20 minutes or so. 

Do a series of folds again. 

Cover and let rest another 20 minutes. 

Do another series of folds. By this time the dough should be just about ready. 

It won't be very sticky & you can handle it without using flour on your hands. If that's the case, then it is ready. Sprinkle a little flour on the board or whatever surface you're using to work with the dough. 

Knead it 2 or 3 times & shape it into a ball. Let it rest 10-15 minutes, then you can roll it out for your cutter or cut it into smaller pieces and roll those into balls.  

I really need to get a decent camera so I can shoot a video of the process. It is a lot easier than trying to explain it. 

This was my result. Now...you can use more dough if you like, but frankly, I like mine with very little dough. They aren't as pretty and round, but the balance is a lot better. More even as far as sausage bite to dough amount. My grandma used to peel the sausage and they are good like that too, but it is more work. 

Now, if I could just get the oven to behave, we'll be in great shape! One of the elements sometimes flakes out on us. Which isn't bad for some dishes that can be rescued, but can pose problems for bread dough or cakes.

Any questions about the recipe...just shoot me line! Happy Eating!

Wednesday, September 20, 2023

Recipe: Easy Smothered Creamy Mushroom-Garlic Pork Chops


Yes, a really long title. I might change it. We'll see. Or maybe I'll add one more word with 2 syllables. Then it will be the correct cadence for a song. ๐Ÿ˜†

How about: "Easy Smothered Creamy Dreamy Mushroom-Garlic Pork Chops?" ๐Ÿ˜†

This recipe has been in meal rotation here for many, many, many years. It comes up every once in a while. It is not a weekly thing. I can't remember where it came from. I don't remember if it was family related. I know I didn't get it from a cookbook, though it is likely that it's in one (or 10,000) somewhere. And if not, then it should be. 

It's easy, and it can get even easier and still be tasty. The version in the pic above took a little more time, but not that much. This recipe serves 2, if you're planning on each person getting 2 chops (which is always a fair amount, though it is over the recommended amount). And when I say "fair amount," I mean fair as in evenly divided and fair as in a large amount, but not too large (unless you are following the chart re: servings of meat per meal or per day). 

They turned out so tender and lovely. No knife required. Great flavor. 

You'll need: 

4 pork chops (thinly sliced. You can use thicker, but add extra cooking time)

Mushroom soup (canned or equivalent amount of homemade)

Milk (which you won't need if you use homemade mushroom soup)

*****1 med. garlic clove - use fresh if you have it! The powder just doesn't cut it for this one.

S&P

Oil for sautรฉing (extra virgin olive oil, avocado oil, or whatever you normally use) 

Approx. 3/4 c A/P flour for dredging. 

You can do this in one pan if the pan you are using is oven friendly. Otherwise, a baking dish large enough to hold the chops will be necessary. 

Method: 

  • Sprinkle both sides of chops with S&P. The salt should be to your taste, but go heavier on the pepper. (Also, be careful with the salt if you use canned mushroom soup. Some of them have too much salt.)

  • Rub the S&P in, then let them sit for a few minutes (this is a short dry brine, but with cuts of meat like this, you don't really need a long one). 

  • Mince the garlic clove(s).

  • Place the flour in a bowl or whatever you use for dredging. Add 1 tsp. black pepper and mix well.

  • Start heating the oil in the frying pan, medium heat. You don't need a lot of oil, just 1/4 inch (or so) depth. 

  • Dredge the chops & brown them on both sides, placing them on a plate  or sheet pan until all are browned. 

  • Drain off the oil, but leave the good bits in the bottom of the pan (leave the "fond," if you need chef-speak. lol). 

  • Dump the mushroom soup in the pan. If you're using canned, fill the can 3/4 of the way up with milk and dump that in too. Stir until well combined.***

  • Place chops in pan. Divide minced garlic into fourths & use 1/4 for each chop (sprinkle over each). Spoon some of the mushroom soup over the chops to cover the garlic. 

  • Put a lid on the pan and put it in the oven. Set oven to 350 degrees. You can preheat the oven, but it really isn't necessary. 

  • Bake for 30-40 minutes. Check for tenderness at the 30 minute mark. They should already be tender. I usually leave them in for another 5 or 10 minutes after that check. (Your oven mileage may vary. ๐Ÿ˜„)

If you are using a separate baking pan, just put a small amount of the soup on the bottom, then the chops, sprinkle with garlic, then pour the rest of the soup over the top & cover before baking. 

You can also make this dish without sautรฉing. I have done it more than once in the past when I just didn't have time or energy to brown the chops. It is still really good this way, but it is over the top good if you brown the chops first. Over the top & beyond if you use homemade mushroom soup. 

I'm not sure if I ever posted a good mushroom soup recipe on the blog, but if I haven't, I'll do that real soon. It's pretty easy. The biggest PITA is chopping the shrooms. ๐Ÿ˜„ Other than that, it's NBD. 

***Alternatively, you can just make a mushroom gravy/sauce  if you toss some sliced shrooms in the pan (4 to 6 oz.) After pulling the chops out, drain the oil until 2-3 Tbsps. remain and sautรฉ until slightly brown. Let most of the liquid evaporate. Then toss in some flour (2-3 Tbsps.). Keep stirring & let flour cook for 3 minutes (still the sweet spot for getting rid of the raw flour taste, as far as I know.) 

Add milk a little at a time until the sauce is thick enough to coat the back of a spoon. You can also use a little water or stock if you don't want to go crazy with the milk. Add a little heavy cream too, if you have any. Maybe 1/4 c or so.

Taste & adjust salt if needed. Then proceed with the rest of the recipe. That amount should be enough for the dish. I'll run a check on it & adjust here if needed (hopefully I won't have to, but it's possible). 


Friday, September 15, 2023

Restaurant Review: Bellville Meat Market


If you haven't visited Bellville Meat Market, you should. They have a vast array of fresh meats, meats that are already smoked for your convenience, and many other great items. Cheese, jerky, dried sausage, summer sausage, regular sausage (try the double black pepper! Excellent!), and even some desserts. Butchers are on call at the meat counter to serve you in a prompt and courteous manner. 

But that is not what this blog post is about. We'll save all that wonderful stuff for another day. Today we are covering the "restaurant" portion of the meat market. BBQ plates, sandwiches, and loaded baked potatoes are on the menu.

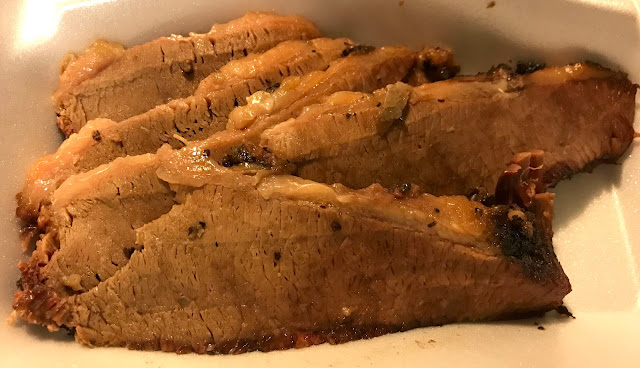
This is our "go-to" place for brisket in Austin County. The brisket is always moist, tender, and flavorful. No sauce needed. I have never had bad brisket from Bellville Meat Market. You can order it by the pound, which is what we usually do. You can get slices that are lean, or opt for a fattier version. Just ask. 

One day we decided to get a couple of side orders with a pound of brisket. The brisket was wonderful, as always. 

The beans were okay. Could have been better though. 

The bacon Mac & cheese? No. Just no. The processed cheese completely overwhelmed the bacon and macaroni. It was like eating straight processed cheese that had texture. I know there are plenty of people who like the processed cheese (especially Velveeta.) We even use it here for dips on occasion. But it is pretty strong, so you need a good balance. Unfortunately, the Mac & cheese did not have that balance. So avoid it unless you are a dyed-in-the-wool Velveeta lover. One who could just drink the stuff with a straw.

The sauce. Well, just like everywhere else, it could use massive improvement. It's thin and sad. I never use it when we get brisket because their brisket is always so good. It's not bothersome on a sandwich either. But alone...forget it. It is not the "old timey" sauce that's in its own food group. 

Sad Sauce

If you're passing through Bellville and you have a hankerin' for some good brisket, go to Bellville Meat Market. They have tables outside for dining, or you can take it with you. 

Just look at that gorgeous, juicy brisket! I wish I had some right now. 

Restaurant Review: Spring Creek Barbeque


The BBQ joint that used to be better. I don't know....20 or 30 years ago? We visited Spring Creek recently because of a brisket craving, and... 

MISTAKE. MISTAKE OF EPIC PROPORTIONS. I can't hold back on this one.

Seriously...we would have had a better BBQ meal if we had gone to H.E.B. and picked up a pre-cooked brisket and sides. There definitely would have been more bang for the buck with that option.

It seems to be the bane of many BBQ restaurants these days. They make the BBQ, which may or may not be good caliber, then serve it with pre-made sides and watery BBQ sauce. If the BBQ is of good caliber, you know you can just skip the sides & order a pound or two. 

I wouldn't even recommend that here. The brisket was okay, but not "it's so freakin' good I could eat two pounds of it all by myself without anything else and be happy as a clam" caliber brisket. 

Spring Creek, 

WTH??!!  Please don't claim you represent Texas BBQ. It's an embarrassment. Nothing but BS on the website too. Yeah, I know, you can't expect it to look just like the pictures...blah blah blah...we are way beyond that. 

Potato salad soup, Anyone?


How about some canned green beans?


What is the deal with the lame rolls? 


Where is the smoke ring on the brisket? Was it smoked in an oven?


How in the world can you serve food like this and charge such insane prices and not be ashamed? 

I guess it stopped being about the BBQ long, long ago and love of $$$ took over. 

You really can serve better quality food and still make a profit. 

Instead, we get all of the bells and whistles, and ads proclaiming BBQ greatness, but it is all a lie. It's simply a restaurant skating on longevity to bring customers in. They have been around for SUCH A LONG TIME...surely they must be good, right? 

Nope. Not this time. Somewhere along the way, they lost the magic. 

The food was packed with military precision. Brisket snuggled under its blanket of foil, sides in separate containers with lids to prevent leakage. If the food was as great as the way it was packed, they'd be in great shape! 

On the other hand, that's a lot of unnecessary containers. It is BBQ, for Pete's sake! Load that plate up using the separate compartments as intended. Forget about a "space blanket" for the brisket. The only thing in danger is the bread, which needs to be protected from moisture until the food is about to be consumed. None of that other ridiculous rigamarole! BBQ is supposed to be a little bit messy. People will learn not to tilt the plate and end up with mixed food. Let them learn. It builds character. 


It always saddens me to have to apply the mango forks, but Spring Creek definitely deserves them for their BBQ scam. 


Restaurant Review: Prasek's Smokehouse

Dry ass brisket, premade potato salad, watery coleslaw mush

Prasek's (Sealy location) has many wonderful food items, but their smoked brisket isn't one of them. We had it once before, (a couple of years ago), and it was just as dry then as the second try recently. 

What didn't help? The "bbq" sauce. It tasted like cocktail sauce. Yes! Really! Looked like ketchup, tasted like cocktail sauce. I really wanted some boiled shrimp after I tasted it. 

I don't recall if they have shrimp on the menu, but I hope so, because at least that would be a good reason that we ended up with this stuff...by mistake. If not then they have a LOT of work to do on their bbq sauce. 

Seems to be a trend these days that no matter where you go, the BBQ sauce sucks. What happened to that wonderful, "old timey" sauce that is in its own food group? I would have expected Prasek's to have BBQ sauce like that. 

In case y'all missed the memo, Prasek's: Cocktail sauce & brisket is not a good combo. SMH

Okay...so...on to the side orders. Pre-made potato salad. Very sad. Also, I wanted beans but ended up with coleslaw. That would have been okay except the coleslaw was mush. Really, really watery too. It had an essence of mayo, but just looking at it, you couldn't see that it was there. Because it was so damn watery! Ugh! 

I finished the meal, but I was not a happy camper. Didn't touch that cocktail sauce after the first taste though. Everyone else who had bbq didn't eat their sauce either. 

Let's do better, Prasek's! Unfortunately, you get the mango forks for the brisket; the pre-made potato salad; the watery, mushy coleslaw; and the freakin cocktail sauce! smh

I have no complaints about anything else I have purchased there, though. They have a fabulous selection of food, whether you want something that's ready-to-eat or want fresh meats to prepare at home. 


Tuesday, September 5, 2023

Kitchen Tip: Serve the Perfect Avocado


The photo above was taken at the absolute peak of this avocado's flavor. I am convinced that many who loathe avocado have not had the pleasure of consuming an avocado at its peak. If they had, they would adore avocado and seek it out regularly. 

Nutty, buttery, and just at the right texture: not too firm but not too soft. Easy to peel, no avocado stuck to the skin, and no skin adhering to the avocado (as it sometimes does. The inside of the skin will stick & you have to scrape it off to get to the green goodness. Well, you can leave it on, but I wouldn't recommend it.) I'll take a picture the next time it happens and add it to this blog entry. 

No blemishes on this beauty though - none inside or outside. Just avocado perfection. 

I finally learned my lesson about these some years back. When you shop for them, you will either find them completely unripe and hard as a rock, or mush. Sometimes you get lucky and find an "in between," but even then there's no guarantee it will be acceptable. 

So never mind the "in between," unless you have a grocery store you know you can trust. Buy them when they are completely unripe, and allow them to ripen at home. One or two days on the counter, then when they start to get slightly soft (just barely yielding to finger pressure), pop them in the fridge to finish. 

If you are planning to make guacamole or some other dish for a party, you have to plan ahead so they are at their peak, or at least near it. It is worth the extra effort though. Absolutely. 

Here in South Central Texas, they will ripen in 2-3 days; sometimes 3-4, depending on the time of year. Once you do some personal testing, you will find your own "sweet spot." 

I found out about "The Avocado Guy" in New York City a few months ago. He gets it! So much so that he has turned it into a business. Every city should have an avocado guy like this. Lucky, lucky, lucky! 

Here is his story. Video is almost 11 minutes, and worth the watch for sure!

The Avocado Guy

Sunday, September 3, 2023

Divine Deviled Eggs - The Secret Ingredient


Secret or not so secret. For all I know, many do this already. But if you don't, please check it out, because this version is a really good one. This is not my opinion only though. These were field-tested.  ๐Ÿ˜†

I was actually looking for something neutral to use because we were getting low on mayo, and also because I get tired of running out of filling before all of the eggs are filled to a reasonable capacity. Not a problem with this recipe. There was plenty of filling with a little left over after overloading the egg halves. Say....YEAH!!!!! That's what I'm talkin' about! 

Non-traditional format for recipe posting because as I was typing it out, I just typed out exactly what I did and in what order. So that is how I am posting it here:

Boil 12 eggs in your usual way. (My way is to start them in cold water, set timer for 20 minutes, turn them off when they reach a rolling boil, then pull them when the timer goes off.)

This yielded 12 yolks & 3 white halves that didn't make the cut. Mashed them finely with a potato masher. (Actually, it would probably be considered a bean masher because of the smaller holes. Or heck... just use a fork. That would work too. lol)


The rest of these are approximate:

2 Tbsps mayo (Duke's)

1/4 cup cottage cheese

1 1/2 Tbsps dill relish

3 dashes of Tabasco (garlic flavored)

Pinch of cayenne

1/2 tsp Worcestershire sauce

1/4 tsp finely grated red (purple) onion (I used a tiny garlic grater. You really just need the juice, no chunks necessary. It is for enhancement only. You won't even be able to tell it is there, but your tastebuds will appreciate it.)

1 - 1/2 tsps Grey Poupon 

S&P to your taste ( I used Kosher salt)

I used the masher to mash & mix everything together thoroughly.

Paprika for garnish optional, but it does contribute to the flavor, so DOOOOOO IIIIIIIIIT.....lmao

Adjust S&P if necessary

Sprinkle S&P on the halves before filling. 

The filling was light & fluffy and had a great flavor. I had to make another batch immediately because the first one went to a birthday party.  

So...In this order: 

yolks & whites (mash well)
then mash in:
cottage cheese
mayo
mustard
W sauce
tabasco
onion
S&P
cayenne

Mash well, then add relish & mix & mash that in too. 

Load the halves with a spoon, pastry bag, or just use a Ziplock or similar... (load it, cut a corner off to make a makeshift pastry bag. It does make things easier.)

Any questions, just ask! 

Also, share your favorite version here too! There are so many great variations out there!

Monday, August 21, 2023

Hoity-Toity Turkey Sandwich


Hoity-Toity Turkey Sandwich...so dubbed because my Mom accused me of making a "fancy" sandwich with a couple of extra ingredients. ๐Ÿ˜‚๐Ÿ˜‚๐Ÿ˜‚ (She was kidding, btw.) ๐Ÿ˜†

I wanted to ramp up the bland turkey, and I'll be dipped! It was even better than I expected. 

So here are the ingredients and the order of layers, so you may capture the same great flavors. (Because we all know that the order of layers on a sandwich definitely makes a difference.)

*Please note that I used homemade Creamy Parmesan dressing (that I made for salad the night before. I'll have to post that on the blog too).

Hoity-Toity Turkey Sandwich Construction Instructions

2 slices of Nature's Own white wheat bread - toasted

Very thin layer of mayo on both sides (maybe a scant teaspoon's worth. I used Duke's).

1 slice of provolone (Sargento regular sized slice, not the thin one. If you have the thin ones, use 2).

2 slices of bland ass oven-roasted turkey (Oscar Meyer frisbee-meat turkey). 

Sprinkle ground black pepper on the turkey.

A layer of lettuce, I used romaine (without the rib).

Sliced Roma tomato for next layer.

S&P (don't overdo it though, use more P than S).

Drizzle with creamy Parmesan dressing, just a tsp. or tsp. & a half. 

Then a layer of fresh avocado slices. 

Top with the other slice of toasted bread and dig in! 

If you make it and like it, let me know...or share your variations. I have one already. Remove turkey=Instant vegetarian! I bet it would be just as good. ๐Ÿ˜Š

Saturday, March 18, 2023

Kitchen Tip: Avocado Storage - Keep Your Guacamole Green

Sometimes in life you end up with leftover guacamole. What?! Say it ain't so! How can that be? 

Even the most avid guacamole lover, who seeks out the very last speck with dogged determination, has this problem from time to time. 

 Question: What is the best way to store mashed avocado or guacamole to prevent browning (oxidation)? 

What I started doing a while back was this: 

Find a container with the smallest diameter that will be big enough for your leftovers with some headspace left after the guacamole has been placed inside. You don't need a lot of headspace: 1 to 1 1/2 inches is enough. 

For the leftover portion of mashed avocado below, (1/4 to 1/2 cup), I used a small, vintage serving bowl. It has about a 3" diameter on the top part but it's "fluted," so the bottom part is slightly smaller. The little ramekins used for single servings of creme brรปlรฉe or lava cake are of similar size and would be ideal for a portion this size. 

Put your leftover guacamole or mashed avocado in the bowl and smooth out the top with a spoon so it's nice & flat.  


Add a layer of your favorite salsa to cover the guacamole. It won't take much to cover it. (You can't tell from the pic but the layer of salsa on this batch was about 1/8"-1/4" deep.) Cover the bowl with plastic wrap (or a lid if it has one).


The picture below was taken the next day, 12-18 hours after the protective layer of salsa was added. If you zoom in you can see that the specks on the inside near the top are brown. (I should have left a larger schmear or a small glob o' guac uncovered, but I didn't think about that until I was taking the picture the next day. Of course!)  ๐Ÿ˜


Remove the layer of salsa to consume separately, or mix it in. Look at this lovely green color. No oxidation. No altered flavor. Oxidation does affect the flavor too, btw. But I am blessed (cursed?) with so-called "super receptors," so I can always tell. (P.S. - let's call it blessed rather than cursed. lol)

Placing a piece of plastic wrap directly on top of the guacamole and maneuvering it around so it's airtight is also an option, but you do lose some during removal, and unless it's super airtight, you will still experience some oxidation. (Also, I'm not a huge fan of using plastic wrap, so if I can find an alternative method, I'm all in!)

You can do the same thing if you only need half an avocado for a recipe. Leave the skin on the other half. Place it on the flattest plate you have, nestled in a small puddle of salsa. You can do it without the salsa, but unless it is completely level, air will get in. Wrapping the plate with plastic wrap is optional because the intact avocado skin will protect the rest of the avocado.

I once read (and I don't remember where) about someone putting water on top of guacamole to keep it from oxidizing. Okay, but then you lose some of that good green gold when you drain it off. It may also make your guac too watery. 

Don't use water. If you're not a fan of salsa, there are other things that can be used: mayo, sour cream, hummus, a thin layer of olive or avocado oil, etc.

This would also be a good option if you make a batch for a potluck or a party. You can make ahead of time and not have to worry about it turning on you before the party gets started. 

This method may have already been posted on the internet 10,000 times. I didn't check, but one more won't hurt. So in case you missed the other 10,000 posts, here it is again. ๐Ÿ˜„ 

The amount I saved is roughly the same amount that Chipotle gives you if you decide to order it as an extra. I don't know what the current price is, but the last time I was there, it was still a pretty penny.