Showing posts with label recipe. Show all posts

Tuesday, June 8, 2021

French Pastry Update

Photo Courtesy of demi, CC BY 2.0 via Wikimedia Commons

A Toast to Success! 

I have decided to postpone any further testing for the French Pastry experiment, and will instead focus on presentation. Yesterday when I opened the storage container with the remainder of the experiment, I was immediately alerted by the enticing aroma of French Pastry and transported back in time. It was as if I had an original French Pastry in my hand and had just opened the package. 

So, to test this out, I had to try another piece. It was stellar! I wasn't even thinking about "cure time" for the pastries, but that is exactly what they needed. I am over the moon about this. I hope it will bring others joy too, and soothe the palates of those who adored these sweet treats as much as I did. 

I'll post the exact recipe I used for each element in a future post, as well as the method & equipment I used. This is IT! My taste buds never fail me (except when they are knocked off the grid on occasion when I get a cold or flu). 

This is fabulous news for French Pastry lovers! I know they are out there because I have found posts lamenting the fact that they are gone and sadness because no one can find a decent recipe. 

I'm hoping to have some time this weekend to work on presentation. I wish I could email samples of these so people could try them. 

Wouldn't it be funny if Bimbo took the old recipe out of the "Mrs. Baird's Vault" and started churning them out all of a sudden? That would be pretty hilarious. 😂

On another note, there is at least one other food item I would love to conquer. Enchiritos. No, not the ones they put back on in recent years, (and I don't know if they are even still on the menu because I never go to Taco Bell anymore). I'm talking about the original Enchiritos from way back. They had a hybrid tortilla. Then they took it off the menu, and years later, when they brought it back, they used a boring, crappy flour tortilla. So that was a disappointment. Anyway,  the rest of the Enchirito ingredients aren't hard to emulate, but that hybrid tortilla...well, that's the holdup. But that is for another day. Today we enjoy French Pastry and celebrate a success! 

Photo Courtesy of Jackie RGarcia, CC BY-SA 4.0, via Wikimedia Commons

Monday, June 7, 2021

Recreating Mrs. Baird's French Pastry - Who Remembers This Delightful Snack Cake?

 I certainly remember. This is a discontinued dessert that still haunts my dreams sometimes. I consume it in the dreams, and I can taste it. Then I wake up and curse at Mrs. Baird's for discontinuing it. 

I remember when I used to ride my bike to the small convenience store we had in town, (one of the only ones, if not THE only one at that time), to buy a French Pastry and a comic book. I didn't do it every day, but I did do it pretty frequently. 

My grandma even attempted a recreation before. She knew how much I liked them. Her version was very good, but not the same.  

I still remember when I bought the last one. 1990. I was living in Houston at the time and not enjoying the city. I had no idea I'd be buying the last French Pastry I would ever buy. I would have bought a few more to enjoy, had I known. 

Mrs. Baird's discontinued the French Pastry long before Bimbo bought the company. I don't know what the reason was, but I used to bug the bread man about the recipe when he brought deliveries to the store where I was employed for a while. I even wrote the company years back, but no dice. 

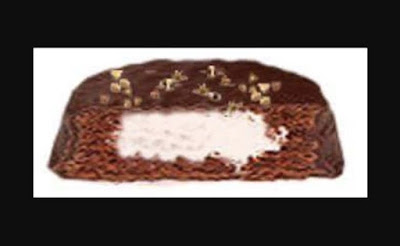
Here is a pic of the original French Pastry. It was the only pic I could find on the internet. It is a little grainy, but it is all I could find after using many different key words & search strings. If you have a better pic, let me know, or please share it in the comments. 


Mrs. Baird's French Pastry

I have been trying to find time to experiment with recipes to recreate this fabulous snack cake. Yes, I can "throw down" and make an "adult" version with real cream, extra layers, and fancy new-gaws, but I'm looking for the authentic Mrs. Baird's French Pastry flavor. So I finally took the plunge, after hemming and hawing about it for some time. 

My experiment turned out to be VERY close to the right flavor. I believe I can nail it with just a bit more tweaking. Once I get that down,  I'll work on the aesthetics. The ones I constructed can be politely labeled as "rustic." 😂 If I had the nifty machine with a conveyer belt to run the things through a chocolate waterfall...hey, no problems then! But I don't, so I'm working with what I have. I'm posting my version below with different sizes and shapes. Go ahead and laugh. I did. 😂


Chocolate Coating: Too Thick!!!

For this one I simply spread the chocolate coating to harden 
on parchment paper and then broke it into pieces. It's a good 
version because the chocolate coating is thin.


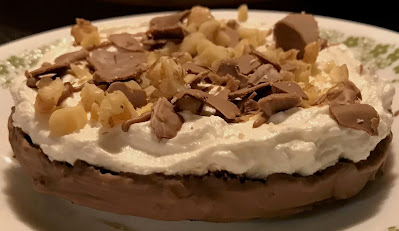
Round version with crumbled chocolate & nuts


This round version has a "chocolate cap." It wilted a bit
overnight so it looked a little more authentic this morning.


The Baird's version was about 4" in diameter & covered with a chocolate "shell" topped with chopped pecans. I want to get as close to that as possible, not just the flavor, but the right texture. Biting into a French Pastry was a delight as well, with the chocolate coating crumbling into the creme as you took a big bite. I will probably end up just piping the tempered chocolate on & then adding the nuts. I didn't hollow the cakes either. I might do that next time. They work pretty well as-is. The closest to correct was actually the rectangular version above with the crumbled chocolate & nuts. It had the right balance of creme, nuts, coating, and cake. 

The "creme" filling was spot on. The coating is just a shade too sweet...I will have to use a different brand of chocolate for that. The base would benefit from a little less sugar too. The texture of the base was about right. It was "Devil's Food Cake." I always thought they used devil's food cake for the base, but I'm planning to try a couple of other versions for the base that use the foaming method. (It needs to be light, but not too light.) Devil's Food Cake might be the ultimate winner in the end. We shall see. I just have to make sure. 

It ended up being pretty darn close though, closer than I expected, so I can't complain too much. 

Wednesday, June 2, 2021

Hummingbird Cake - Taste the Fruity Fusion

 Who loves Hummingbird Cake? 

I remember that this particular cake made a lot of appearances in many different places when I was growing up. I remember that it would show up at the county fair when we worked at the "Chuckwagon Cafe," (operated at that time by Jody Mazac). People would bring cakes in and we'd slice them up and put them in the cake safe to sell during the day. So I would have a piece now and again. Cake sampling! Perks of that job were great! Giant vats of "old timey" bbq sauce made by Eddie Lux's parents (the kind almost everyone used to make that's so hard to find now, unless you make it); Sausage (they usually boiled it, but the brisket was totally legit...and delicious!); steam table with side orders; loaves and loves of bread to soak up that great sauce; BBQ sandwiches...it was a great place to be during the fair, even with all of the clean up when the day was done. We worked really long hours, 6am through 8 or 9pm, but it was temporary, so it was easy to recover once the fair was over. 

This cake was also a frequent visitor at potlucks. My grandma used to make it now and then too. I've even made it at least a couple of times. So...great cake! But...sugar overload!! Even back in the day when calories weren't an issue, it was still too sweet. 

So this time, I made a tweaked version, and baked it in a 9x13 pan because it needed to travel out of town. You can totally get away with omitting some sugar in a cake. It is great for crumb structure, but there's no need to go overboard. I also omitted a great deal of the oil that's called for in the recipe. Guess what? It was still wonderfully moist. I'm posting the recipe now before I forget. And please do make note of the frosting recipe. I tweaked that too, and it was totally bomb! 

Hummingbird Cake


Ingredients

3 cups AP flour

3/4 cup granulated sugar (I prefer Zulka, it's minimally processed & no bone char is used)

1/2 cup light brown sugar

1 tsp. Kosher salt

1 tsp. baking soda

1 tsp. cinnamon

1 pinch of nutmeg

3 large eggs (at room temperature), beaten

3/4 cup light olive oil (coconut or vegetable oil will also work)

1 tsp. vanilla extract

1 tsp. rum (optional)

1 8 oz. can of crushed pineapple with juice

2 cups chopped ripe bananas 

1 cup chopped pecans or walnuts, toasted (but toasting is optional)

Method

(You can use a mixer, but it's not necessary. I used a Danish whisk, but a regular whisk would work fine too.)

Set oven to 350° & coat 9x13 pan with cooking spray. 

1. Sift flour into mixing bowl. Add sugars, salt, baking soda, cinnamon, and nutmeg. Mix well. 

2. Add the oil to your beaten eggs & mix until incorporated, then add to flour mixer & mix until just combined. (Don't worry if it seems thick, the pineapple & its juice will take care of that.)

3. Add crushed pineapple & juice; vanilla; and rum. Mix until incorporated. 

4. Fold in bananas & nuts. 

5. Pour into prepared 9x13 pan. 

6. Bake at 350° for 25 to 30 minutes. If you bake a lot, you know your oven, so adjust as necessary. Test middle with toothpick or thin knife after about 25 minutes. If it comes out clean, take out the cake. Also check to see if cake has pulled away from the sides. That's another good "tell." 

7. Let cool completely before frosting. 

8. Garnish  with additional toasted nuts, if desired. 

You can also use this recipe for 3 9" layers or even cupcakes, if you prefer. 25 to 30 minutes for the layers, 15-18 minutes for cupcakes. 


Totally Bomb Frosting Recipe! 💣

Ingredients:

12 oz. white chocolate chips (I actually used Ghirardelli baking chips in this recipe. The bag is 11 oz. and they do not contain any cocoa butter, but they will still work. If you can find chips with actual cocoa butter in them in your area, well...even better.)

4 oz. heavy cream

1 tsp. vanilla

1 tsp. rum

2 Tbsps. unsalted butter, cubed

1 8 oz. package of cream cheese, room temperature (the brick kind, not the whipped version)

Method:

1. Make ganache. (You can use a bain marie if you like. I made this one using a 1200w microwave.)

2. Pour cream into microwave-safe bowl. Heat for 30-45 seconds. 

3. Add chips to bowl & stir a bit, then set aside for a few minutes. After the wait, continue mixing. Microwave another 10 seconds if necessary to make sure chips are melting. If it seems grainy, add more cream in small increments until it is smooth (you might need to hit it once of twice more with the microwave). 

4. Once the chips are completely melted and starting to look glossy, add in the butter a couple of cubes at a time & stir until well incorporated. It's okay to place in microwave for 10 seconds if needed. 

5. Add vanilla & rum & stir until well combined. 

6. Place a piece of plastic wrap on the surface of the ganache & put it in the refrigerator until completely cooled. It's fine if it hardened. I actually did mine the night before I made the frosting, but overnight refrigeration isn't necessary.  

7. Take the ganache out of the fridge & let rest on countertop for 30 minutes to an hour. 

8. Using a spoon, stir the ganache & scrape the sides to make it easier for the mixer. If you have a stand mixer, just scrape it into the stand mixer's bowl. 

9. Whip the ganache until light & fluffy. Add cream cheese in 3 portions, whipping well after each.

10. Try not to eat it all before you get it on the cake. 😆


Just One More Thing...

*Some like to use a 50/50 ratio for ganache when making whipped ganache. That's fine if you're planning to use it to pour ganache on a dessert, or to use for dipping other yummy things like cream puffs, but stick to 1:3 for this ganache. (1 part cream, 3 parts chocolate.) This way you won't have to add anything else in to thicken the ganache, like powdered sugar. This version was smooth, creamy, and divine! I didn't try to use it for piping since I was making a 9x13, so I can't speak to that. I will do a test on that in the future.  


Shout-Out to Zulka! Keep Rockin' It! 


Tuesday, May 5, 2020

Hassle-Free Cheese Enchiladas with Homemade Chili Gravy


Fast & Hassle-Free Cheese Enchiladas


A cheese enchilada dinner in under an hour. Works for me. The homemade chili gravy is a MUST though. The canned stuff totally sucks.

Use your favorite cheese. I used American cheese in brick form, (Velveeta or the like), and cut the cheese (ha ha) into sticks after it had some time in the fridge so it would be easier to cut. The enchiladas were topped with grated cheddar cheese, plus diced onions (truck-stop style, back in the day).

The best thing about these hassle-free enchiladas is skipping the PITA oil procedure. I don't like using the microwave method, (and we don't have a microwave in the house anyway), so this is what I do:

Heat up a comal, or cast-iron frying pan, (I have also used a non-stick pan and it worked just fine), spray lightly with oil spray, take the corn tortillas out of the package and put all of them in a stack in the middle of the pan. I used 10 the last time, so all 10 were stacked on top of each other in the pan.

After the bottom tortilla is heated, (and lightly toasted), spray the tortilla on the top of the stack, and flip the whole stack. Flip the tortilla that was on the bottom, spray it, then flip the whole stack over again. When the first tortilla is lightly toasted, remove it from the stack and place it in a container with a lid. (I don't have a tortilla holder so I use a wide, shallow bowl and put a pot lid that fits the bowl on top. The key is having enough space so the entire stack is covered when you're finished toasting the tortillas.) Keep going with the stack until all are lightly toasted. (And hey...you can do this one tortilla at a time, but by keeping them in a stack, the weight of the other tortillas hastens the toasting. Besides, it's fun to do it this way. lol)

I don't spray each tortilla every time, it just depends on how much oil is still on the bottom of the pan.  If there is still a sheen on the bottom of the pan, I don't use the oil spray. When you are ready to assemble your enchiladas, flip the stack over and start with the tortilla that's on the bottom.

You get more flavor this way than you would with the microwave method, and you don't have to deal with the PITA method and get oil everywhere and have the oil odor lingering in the house all night long. It's a win-win.

Hassle-Free Cheese Enchiladas

For the chili gravy: 

1/4  cup oil or butter
1/4  cup A/P flour
1 tsp. garlic powder
1 tsp. onion powder
1/2 to 1 tsp. ground cumin (to your taste)
1 tsp dried oregano
1 tsp. paprika
1-2 Tbsps. chili powder (to your taste)
1 pinch of red pepper (or more if you like more heat)
2 cups of water, chicken stock, beef stock, or vegetable stock)
S&P to your taste
1 Tbsp. tomato paste (optional)

1. Using a 10-inch frying pan, make a roux with the flour & oil (or butter). Cook at least 3 minutes to eliminate the raw taste of the flour -- letting it cook until it is slightly golden is optional, but preferred. 

2. Add the chili powder & paprika, stir until combined, keep stirring & cook for 1 to 2 minutes. 

3. Add the stock while stirring to prevent lumps. 

4. Add the rest of the ingredients. Let it simmer for a few minutes before assembling the enchiladas. 

5. You might want to add a little extra water or stock to thin the gravy out a bit more before using. 

For the enchiladas:

10, six inch, white or yellow corn tortillas (homemade or your favorite brand)
16 oz. brick of American cheese or 20 oz. of your favorite cheese, shredded (I used American cheese but I didn't use the entire pound)
1/2 -3/4 cup of shredded cheddar cheese for the topping
Oil spray (as needed)
Chili gravy (recipe above)
Optional: 1/2 cup white onion (small dice)

1. Heat 10 corn tortillas using your preferred method.

2. Preheat your oven to 350 degrees.

3. Spray a 13x9 inch baking pan with oil spray. Ladle some chili gravy into the baking pan, just enough to cover the bottom.

4. Ladle a scant amount of chili gravy onto a tortilla, (1-2 Tbsps.), then enough shredded or diced cheese for filling (1-2 oz.). ***Alternatively, you can dip the tortilla in the gravy, but ladling it in does the job with less mess.*** Sprinkle in a teaspoon of diced onions if desired.  Roll up the tortilla and place it seam side down into the pan.

5. Keep going until all tortillas are filled, then ladle as much chili gravy as you like over the top of the enchiladas.

6. Cover your pan with a lid or with aluminum foil and place it in the oven.

7. Bake at 350 degrees for 25 minutes. Remove the foil, sprinkle shredded cheese on top and sprinkle with the rest of the onions, if desired. Bake for 5 more minutes until the cheese melts.

8. Enjoy with your favorite side dishes.

Feel free to use more cheese. I don't like cheese overkill...(cheesed up to the point where all you taste is cheese and none of the yummy gravy or the corn tortillas), so I don't use an insane amount.

Sunday, May 19, 2013

Tex-Mex Chicken Breasts with Rockin' Red Sauce

Annnnnnd....we have yet another success story from "Dr. Frazier-stein's" lab!! This recipe is fast and easy and will surely please lovers of Tex-Mex!

Click the link below to view this yummy creation:


Very Tasty!!


Sunday, January 20, 2013

Spicy Sriracha Chicken Tenders

Chicken tenders marinated in Sriracha, then tossed in a spicy coating. Unlike the Colonel, I will share my recipe. There's no junk in it to hide from the public. Like, you know, msg and other bad crap you shouldn't be putting in your body.

Served with celery, avocado slices and spicy ranch dressing.

Most of the time spent for this dish is the preparation time. The cooking time is minimal.

Stay tuned for this recipe, I'll post it as soon as I can.


Spicy Sriracha Chicken Tenders

Spicy Sriracha Chicken Tenders


Saturday, September 22, 2012

Pamper Yourself.....with a Jalapeno Omelette

I was dining alone one night and I really wanted an omelette. Not just because I wanted to eat one. I really wanted to make one because they are fun to make. (We had a good portion of leftover chicken chili in the fridge, so I wasn't sure if I should. I should just eat the chili, really.) Then I thought: Why not? I can make a version of "huevos rancheros"--omelette style.

The result was very pleasing aesthetically and the flavor was fabulous. So I started thinking about a lot of things. I enjoy pampering others with wonderful food from the kitchen. Why not pamper myself sometimes? We all should. Instead of getting dinner together in a slapdash fashion when dining alone--make it fancy once in a while. Pretend you are "The Chef" and you are preparing a meal for royalty. Actually, pretend you are making it for someone special, because you are! (I must add: I consider all recipients of my kitchen creations as royalty. Special and royalty.)

I just have to add: Hey, this lovely meal was made using leftovers!! Isn't this far better than going through the drive-thru at a fast-food restaurant? Honey, does a chicken poop in the coop? HELL YEAH!

So here it is, a lovely jalapeno omelette. Fresh jalapeno (small dice) was added to the beaten eggs before cooking. You can see the Monterrey Jack cheese that's inside the omelette peeking out, like a movie teaser clip.

The omelette is topped with leftover homemade chicken chili. The chicken was freshly ground thighs from Whole Foods. There was no "eau de dishrag" odor when the chicken was cooking. (That happens with ground poultry sometimes, but not when the ground poultry is fresh and organically grown.)

Topping the chili: a little grated Tillamook Cheddar and some more diced, fresh jalapeno. Serve with your choice of tortillas--in this case, two white corn tortillas.

It was a very good supper. I recommend that you try this at home. Less than 10 minutes and you gots a great meal, Y'all!!! WOO!! :)

Jalapeno Omelette


Thursday, June 28, 2012

Chicken Stock Obsession

One of my favorite activities in the kitchen is preparing chicken stock. I like to make beef stock, too, but that one is more labor intensive. With chicken stock, you just throw it all in the pot and you're good to go. The most labor intensive part of making chicken stock is the end when you strain it and cool it. Well, you do need to skim some junk off of the top during cooking once in a while--but that's easy.

If you're in a pinch and you need stock quickly, you can simply throw in some chicken parts and cook for a short time. For classic stock, though, you want to simmer for a longer time in order to achieve maximum flavor.

Here's my personal procedure:


I never buy chicken parts anymore. I haven't for many years. Well, I take that back--if there is a good sale on chicken breasts, legs, thighs, etc. and they are of exceptional quality and not "Franken-chicken," I may buy some from time to time. Otherwise, forget it.

It's much more economical to cut your chicken at home. Not only can you cut it the way you like, (and not have to worry about bone splinters that occur so often in pre-cut chicken because pre-cut is usually done with a machine), you can use the extra parts that no one will eat to make chicken stock.

In the photo above, there are two sets of chicken remnants. The one on top is from a free-range, organic fryer. This brand had the giblets and the neck. You generally don't see that too often these days, unless you buy a hen instead of a fryer. The chicken on the bottom is from a local company, no giblets and neck for that one. It's a lot smaller, too.

When I cut up a chicken, I usually take the breasts off sans bones, so these chickens have the breastbones intact. The legs, thighs and wings are removed and the wingtips are saved for stock. Why not? No one eats those.

This chicken is frozen. You don't need to defrost before you make stock. Just toss it in there.


Add water, leaving about 1 1/2 to 2 inches of space at the top. You aren't going to be boiling the hell out of it, so you won't have any problems with it boiling over. Oh, and by the way, it's an 8-quart stockpot.


Next, add your veggies. You don't have to get fancy about those, just make sure they're washed. You can snap the carrots and celery in half and throw it in there, celery leaves and all. Don't even bother cutting it. Maybe cut the onion half in half, that's about it. You can use whatever odds and ends you have in your fridge as far as vegetables go. Just avoid using any strong vegetables, like broccoli.

Ingredients for classic chicken stock are: onion, celery, carrots, fresh parsley (leaves & stems but you can also use stems only), a bay leave and a handful of peppercorns (about 1-1/2 teaspoons for this recipe).

For this batch, I had a couple of chunks of red onion so I threw those in, too. Turn on the heat to medium high or so, but don't let it get to a rolling boil. You want a slow simmer for stock. Once it starts to simmer pretty good, reduce the heat to low or medium low (Depending on your stove--this varies).


Here's the whole shebang in the pot. it's already accumulating foam on top. This is the stuff you want to skim from the top, along with fat when it rises. Oh, and repeat after me three times: NO STIRRING!! Never stir stock. You want all of the impurities to sink or rise so you can remove them easily.


Here's some "chicken skim" that came up. You'll get this early on in the "chicken stock journey." 


Here we are, almost at the end of the journey. (The stock was simmered for over 2 hours, probably closer to 3). Your stock is ready to be strained and cooled. Unless you have one of those really cool stockpots that have a faucet on the bottom, you'll have to do this by hand. Dip out as much as you can. Use tongs to carefully remove the chicken and vegetables. Then you can easily pour the rest through your strainer.


Here is the rich, gorgeous result. I only strained this stock through a standard strainer. If you want even more purity, use a strainer with smaller mesh lined with cheesecloth.

Cool and refrigerate. Or you can freeze it, it keeps for a long time. If you do a lot of cooking, though, it won't be in your freezer for long. Any fat you may have missed with your earlier skimming can be removed easily after refrigeration.

I got about 1-1/2 gallons or out of this batch. It could have been a few ounces more or less--I didn't measure it. Let's just say it was A LOT, ha ha! 

What you end up with is a much healthier stock than what's available in grocery stores. It's really economical, too. A quart of stock in a regular grocery store usually runs about $2.99. It's even more in specialty food stores.

So you get cheap stock that is of great value. There's no salt added so you can use it however you like. Use it to cook your rice, pasta or vegetables for extra added flavor. That way, you don't need to use a lot of butter or extra salt. Use it for soup, for poaching, or in a sauce. Whatever you do, use it in good health!

Important things to remember when making stock:

  • Never, ever stir it!!
  • Always start your stock with cold water, (if you don't, it will be cloudy) 
  • Never allow stock to come to a full, rolling boil. (you'll end up with cloudy stock for sure) 

Until next time....Happy Eating!!! :)